There is nothing more frustrating than pulling out your smartphone to capture a once-in-a-lifetime moment, only to be greeted by the dreaded “Camera Failed” error. Whether you are rocking the latest flagship or a budget-friendly device, Android camera malfunctions can happen to anyone in 2026.
From black screens and app crashes to slow shutter speeds, these glitches often stem from software conflicts or temporary background processes. The good news? You usually don’t need a repair shop to get your lens back in action. In this guide, we will walk you through the most effective, field-tested methods to resolve your Android camera issues once and for all.
1. The “Quick Fix” Checklist: Start Here
Before diving into complex settings, let’s tackle the low-hanging fruit. Often, a simple software hiccup is the culprit behind your camera not working.
- Restart Your Device: It sounds cliché, but a simple reboot clears the system cache and stops background processes that might be hogging the camera hardware.
- Check for Physical Obstructions: Ensure no third-party case or camera protector is covering the sensors.
- Update Your Software: In 2026, Android updates often include critical patches for camera drivers. Navigate to Settings > System > Software Update to ensure you are on the latest version.

2. Clear Camera App Data and Cache
If your camera app keeps crashing, it is likely that the temporary files or cache data have become corrupted. This is one of the most reliable ways to fix camera failed error on Android.
- Open Settings on your phone.
- Go to Apps or Applications.
- Find Camera in the list of installed apps.
- Tap on Storage & Cache.
- Select Clear Cache first, then Clear Storage (or Clear Data).
- Restart your phone and try opening the camera again.
Note: This will not delete your photos or videos; it simply resets the app’s settings to their factory state.
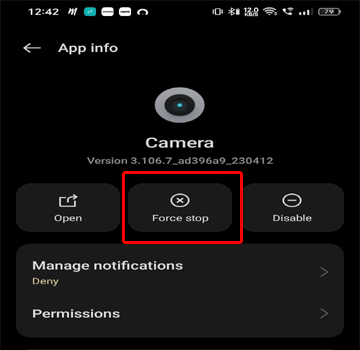
3. Check for Third-Party App Conflicts
Do you have a flashlight app, a QR scanner, or a custom camera filter app installed? These apps often request permission to use your camera hardware. If one of these apps is currently running in the background, it may be locking the camera sensor, leading to the “Camera Failed” warning.
Pro Tip: Boot your phone into Safe Mode. In Safe Mode, all third-party applications are disabled. If your camera works perfectly while in Safe Mode, you know for a fact that a recently installed app is causing the conflict. Simply uninstall your most recent apps one by one until the problem disappears.
![[Solved] Fix Camera Error on Android](https://www.fonelab.com/images/android-backup-restore/fix-camera-error-android.png)
4. Reset App Preferences
If you have been tinkering with permissions or disabling system apps, you might have accidentally broken the link between the OS and the camera module. Resetting app preferences is a powerful way to fix this without losing your personal data.
- Go to Settings > System > Reset options.
- Select Reset app preferences.
- Confirm the action.
This will reset all disabled apps, notification restrictions, and background data restrictions, often resolving the “Camera Failed” error instantly.
5. Check Battery and Power Modes
Many Android devices in 2026 come with aggressive Battery Saver or Power Saving modes. When your battery is low, the system may kill power to “non-essential” hardware, which can include the camera module.
Plug your phone into a charger or turn off Power Saving Mode in your quick-settings panel. If the camera starts working immediately, you have identified the source of the issue.
6. Perform a Factory Data Reset (The Last Resort)
If you have tried every step above and are still seeing the “Camera Failed” error, you may be dealing with a deep-seated system corruption. A Factory Data Reset wipes everything on your phone and returns it to the state it was in when you first unboxed it.
Important: Before performing a factory reset, ensure you have backed up all your photos, contacts, and essential documents to the cloud or an external drive.
To reset:
- Go to Settings > System > Reset options.
- Choose Erase all data (factory reset).
- Follow the on-screen prompts.
7. When to Seek Professional Help
If even a factory reset fails to resolve the issue, the problem is likely hardware-related. A loose internal ribbon cable, a damaged lens sensor, or a motherboard issue cannot be fixed with software tweaks.
In this case, check your warranty status. If your device is still covered, contact the manufacturer’s support center. Taking your phone to an authorized service provider is the safest way to ensure your hardware is repaired correctly without voiding your warranty.
Conclusion
Dealing with a camera error is undoubtedly annoying, but it is rarely a permanent death sentence for your device. By methodically working through these steps—starting from a simple restart and moving toward app management and software resets—you can resolve the vast majority of Android camera issues.
Remember to keep your device updated throughout 2026, as software patches are your best defense against recurring bugs. With these tips, you’ll be back to snapping high-quality photos in no time.